Create & Submit Sitemap for a WordPress Website with pictures
Create & Submit Sitemap for a WordPress Website with pictures
Sitemap creation and submission are very important if you really want your content to be index faster on Google and other search engines. A sitemap is something which tells webmasters about the links added, updated or deleted on your website.
Every time when you add a post or page, delete some content on your website or update the content, sitemap gets updated itself and search engines like Google follows sitemap timestamp to evaluate and rank your content accordingly.
We have always said that websites which are updated regularly have high chances of ranking than a non-updated site. Google also wants frequent and fruitful updation.
So, how to create a sitemap and how to submit a sitemap to Google and other search engines? is the main concern now.
[embed-vi-ad]Creating and submitting a sitemap
If you do not create or submit your sitemap, chances are very hard that your site will rank. If you don’t do it it will come under a big SEO mistake.
For a non-WordPress Website
When we call a non-Wordpress website. it simply means any website which
So, If you want to create a sitemap for
By the way, this article can be used for creating a sitemap for a WordPress website as well. But I don’t recommend this way of sitemap creation and submission for WordPress.
If you want to migrate form blogger to WordPress this post will be useful for you.
Read Recommended – Blogger to WordPress migration in easy steps with pictures
For a WordPress Website
In case of a WordPress blog or website sitemap creation is very easy. You can do it by installing Yoast SEO or All In One SEO. Both the plugins are suitable for SEO management in WordPress.
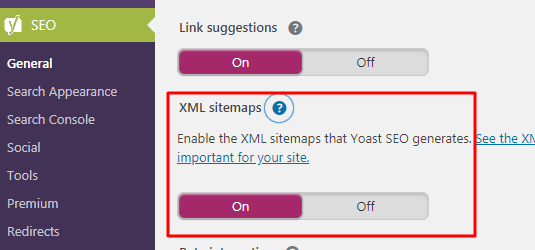
Enable Sitemap Creation Using Yoast Plugin
For SEO purpose if you have installed Yoast SEO plugin then follow the steps provided below to enable the sitemap creation.
Once sitemap creation is enabled then you can find it at https://domain-name.com/sitemap.xml
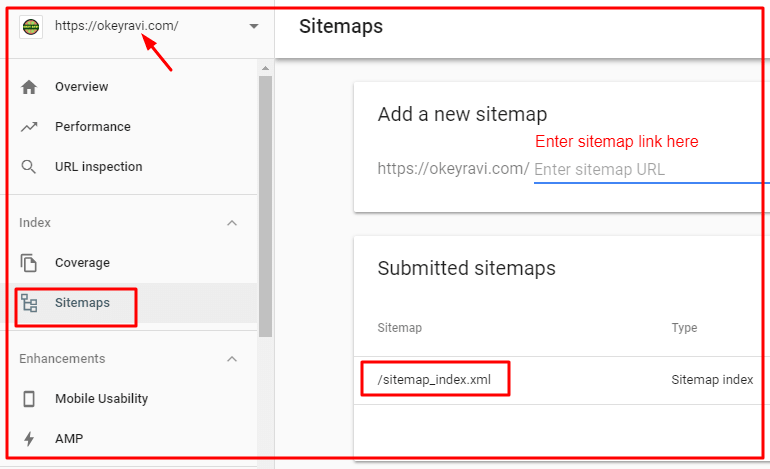
In case of Yoast, this address might be changed a little. For a reference, you can see our sitemap address which is “http://okeyravi.com/sitemap_index.xml”
If you have not installed Yoast yet then download here and install to your WordPress.
Once installed follow these steps to enable sitemap –
- Navigate to Yoast->General
- Open Features tab
- Find XML Sitemaps settings
- Click on “on” button to enable it

Enable Sitemap Creation Using All In One SEO Plugin
Please keep in mind that you only have to use either All in One SEO or Yoast. Don’t install both the plugins together. Otherwise it will create an issue for your website SEO.
If you want to install All In One SEO. Download All In One SEO now.
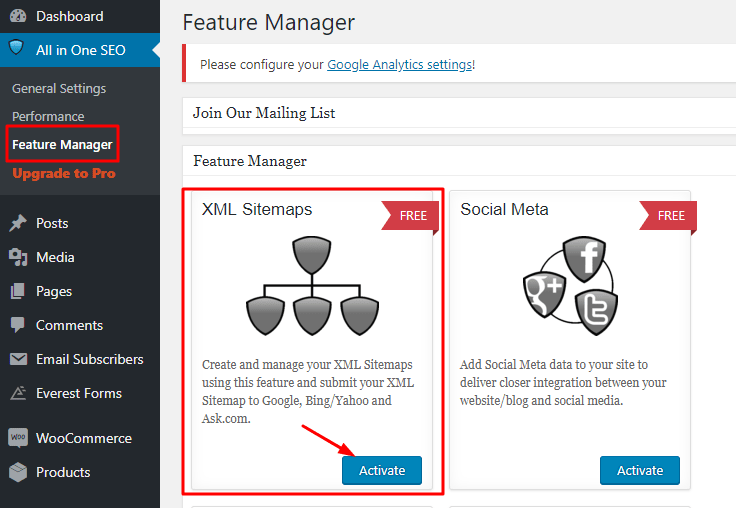
Now follow these simple step to enable your sitemap creation –
- Install and Activate All In One SEO Plugin
- Go to Feature Manager
- Activate the features you want to use like XML Sitemap, Video SEO, Social and More
- Once enabled you can see the XML Sitemap in the menu options of All In One SEO

In All In One SEO, you also have an option to for “Video SEO” But to get this you have to buy the pro version.
So, you might be happy. You have performed an important task of blogging which is sitemap creation.
Now we will see, How we can submit this sitemap to Google, Bing and Yandex Webmaster tools?
Sitemap Submission to Webmasters
Generally sitemap submission is done for Google, Bing and Yandex Webmasters. We will see them one by one here. We have focused more on Google Sitemap Submission, you can follow up same for Bing and Yandex.
Sitemap Submission in Google Search Console
Follow the steps to submit your sitemap to Google Search Console –
1 Open Google Search Console
2. Click Start Now to create an account
3. Sign in using your Gmail
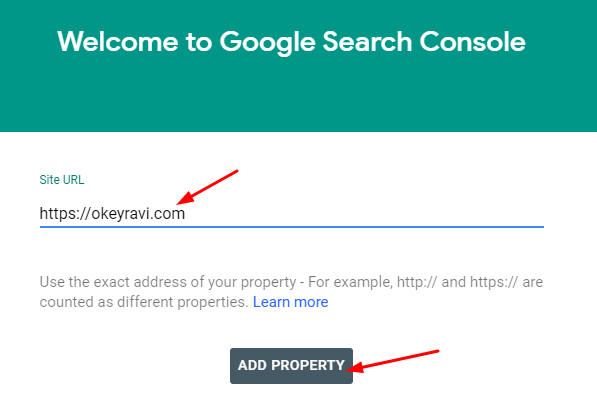
4. Enter your domain name and click on Add property

5. Verify your domain Ownership using any method. The available methods are Html file upload, Html tag, Google Analytics, Google tag manager and Domain name provider.
Html File Upload – Download and upload the given html file to the root directory i.e inside public.html folder.
HTML Tag – This method is very easy. an HTML tag will be provided to you. Simply install and activate the Insert headers and footers plugin. Once installed put the HTML tag inside the header section and click on the save button.
Google Analytics – You can do it in either way. But first, you need to add your website to Google analytics. A tracking code called gtag.js tracking code will be provided to you. Just add that code before </head> tag.
For this, you can use the Google Analytics Plugin or Insert headers and footers plugin.
These three methods are sufficient enough. Don’t go for Google tag manager or Domain name provider methods. It is a bit complicated than these.

6. Once your domain ownership is verified. Now you are ready to submit your sitemap.
7. Go to stemap section and add your sitemap link.

8. You are done with the process. Wait for Google to discover, evaluate and index your links.
Note: The process goes same for Bing and Yandex Webmaster. You can submit your sitemap there as well. If you do so, these search engines will index your site.
Read Also – Google index issue, how to index faster on Google?
If you liked this article, then please subscribe to our YouTube Channel. You can also find us on Twitter and join our Digital marketing hacks Facebook group.


Comments (4)
Digital Marketing Company in chennai
You can also add your sitemap location in robots.txt to improve crawling.
Okey Ravi
Hi, yes you are right. Sitemap can be added in the robots.txt file. this will help Google to crawl your website even faster and better
omkar mirajgave
Thanks for helping us via WhatsApp and blogs.
Ravi
Hai sir
Thank you so much for the informative article i always waiting for your new articles keep supporting us.
Comments are closed.