How to Setup Widgets on WordPress Blog Header/Footer/Sidebars
How to Setup Widgets on WordPress Blog Header/Footer/Sidebars
When it comes to adding or setup widgets on WordPress. You have to make a rough design of your website to do it properly. So, I am sharing today ” How to Setup Widgets on WordPress Blog?”.
Setting up Widgets in WordPress is not a tough task, but it’s not easy too. So, let’s see How will you do it?
Why are WordPress widgets important to setup?
WordPress Widgets add contents and features to your Blog Sidebars. Some examples of WordPress widgets which come by default like Calendar, Audio, Video, Archives, Recent Comments, Tag Cloud and more
Widgets were actually designed to provide a simple, flexible and easy-to-use way of giving design and structure control of the WordPress Theme to the user.
Read More: How to transfer Posts and Pages form on WP to Other?
With the help of Widgets, you can easily customize your Blog Header, Footer, and Sidebars. Like if you want to add some custom HTML in your header footer or anywhere in your blog you can easily use custom Html Widget.
For beginners, this is an easy way to add things like – galleries, quotes, popular posts, facebook like boxes, and other dynamic items on their WordPress site.
Widgets are very helpful for those who don’t know how to code properly as Widgets require no code experience or expertise. They can be added, removed, and rearranged on the Theme Customizer or Appearance ->Widgets in the WordPress Administration Panel.
Some WordPress Widgets offers customization and options such as forms to fill out, includes or excludes of data and information, optional images, and other customization features like captcha and more.
If you want to find out plugins that come with a bundle of widgets then you can find them in WordPress plugin directory.
Read More: Top 30 Plugins which is helpful for a WordPress Blog?
How to Setup Widgets on WordPress Blog?
1. Installing a Widgets in WordPress
As I have discussed earlier in this article WordPress comes with some prepackaged Widgets bundle like Custom Html, Image, Video, recent posts, recent Comments, Tag Cloud, Meta, RSS and more
But these are some basic widgets and will not provide you some amazing features.So the question arises is how to get those special widgets?
The simple way to get some specific kinds of widgets is to install a plugin. Most of the plugins also contain their respective widgets and you can easily add those widgets to your header, footer, and sidebar.
You can get Widgets by these means –
1. When you install a theme, you will also get a bundle of widgets with them. those widgets are very important to make your design as like as the theme demo.
They mostly contain different size ads widgets and Homepage top, middle and bottom section widgets. A WordPress premium theme will also provide you space to add or set up those widgets.
I am using Colormag premium theme so widgets provided by Colormag are – Breaking news, call to action, Currency Exchange, Category Slider, different Post Style and more.
Want Clormag Premium theme at Cheap cost- WhatsApp me – +91 9576474619
2. Setting up WordPress Widgets Using Theme Customizer
To customize a Widgets using WordPress theme Customizer you have to follow these steps-
1. Login to WordPress Admin Panel
2. Go to Appearance ->Customize
3. One the screen Opens, Click the Widget menu in the Theme Customizer to access to the Widget Customize Screen.
4. Go to Widgets Section and Find Out appropriate Widgets for your blog and put in the right location. Adding is easy. follow the next steps.
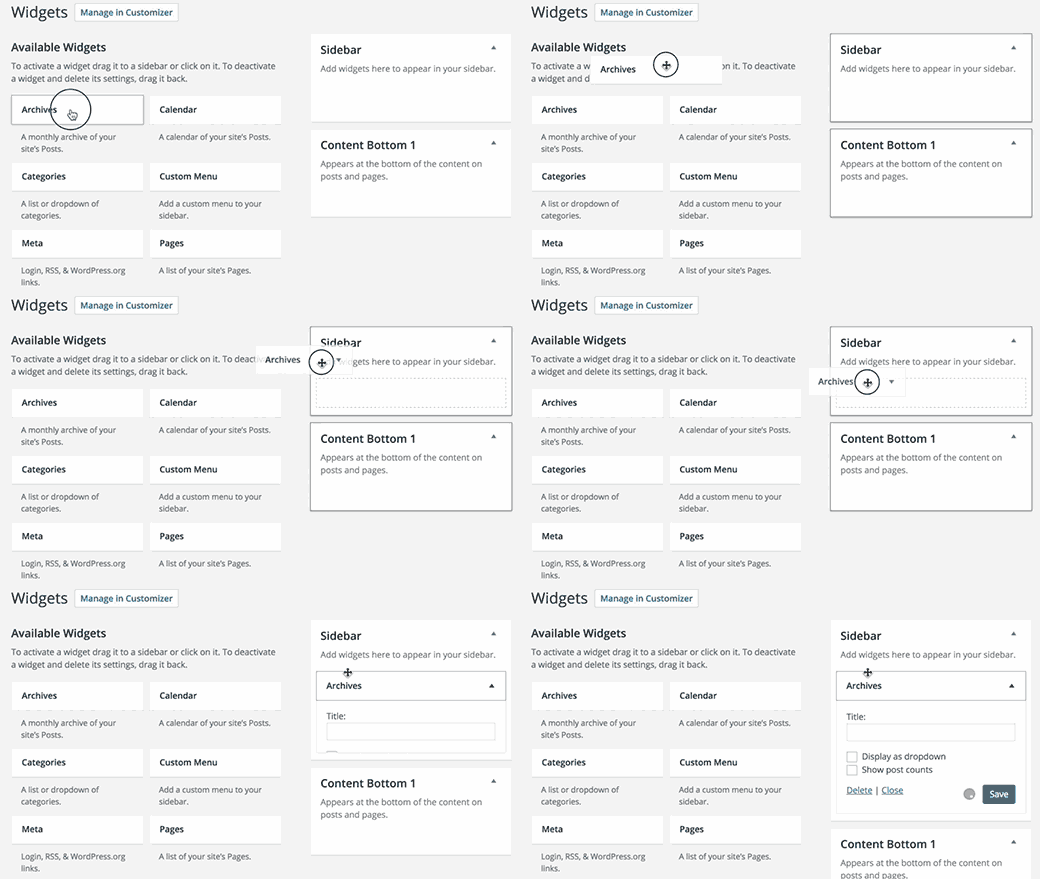
5. Click Add a Widget button at the bottom of the sidebar. It shows the list of available widgets.
6. Click on a widget you want to add. The widgets should be added in the sidebar.
7. Must Preview your site and you should see the content from your new Widget. If you not satisfied with the preview remove them.
8. To arrange the Widgets within the Sidebar, drag and drop the widgets in the order you want or click Reorder link and click up arrow and down arrow of each widget, lastly, click done after the arrangements.
Most of the themes support theme customizer option today, but if your theme doesn’t support then You can use the conventional method to add a widget to WordPress.
3. Setting Up WordPress Widgets Using the Conventional method
Conventional Method to know really “How to Setup Widgets on WordPress Blog?” is most popular. Here are the simple steps you need to follow. it only contains drag and drops feature.
You just have to drag a widget and drop it to the appropriate location according to your need.
1. Log in to WordPress Admin Panel
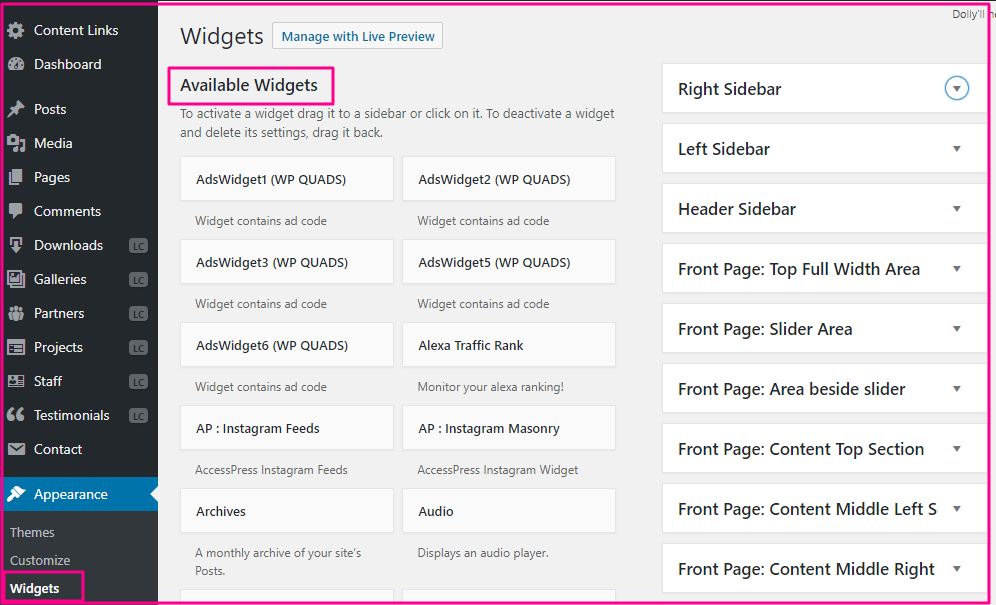
2. Go to Appearance -> Widgets on the WordPress Administration Screens.
3. Choose a Widget and either drop it to the sidebar where you wish it to appear or click the widget, (select a destination sidebar if your theme has more than one like left sidebar, right sidebar, header and footer sidebar) and click the Add Widget button.
There might be more than one sidebar option, so begin with the first one. Once in place, WordPress automatically updates the theme.
4. Preview your site just to ensure that things are added up correctly.If yes then go to step 5.
5. Return to the Widgets Screen to continue adding Widgets.
6. To arrange the Widgets within the sidebar or Widget area, just drag and drop it into place.
7. You can also customize the Widget features, click the down arrow in the upper right corner to expand the Widget’s interface and make the changes. For example – If you want to add a custom ad, then choose an ad widgets according to the size of an ad (like 728×90,350×225) and then give the Ad image URL, Ad image location and text to be shown.
8. To save the Widget’s customization, click Save.
4. Deleting a WordPress Widgets
Deleting a WordPress Widget is simpler than adding a WordPress Widget. Here are the steps to follow –
1. Visit Appearance -> Widget on your WordPress
2. Look at the widget you want to delete in the sidebar and click on that to expand it.
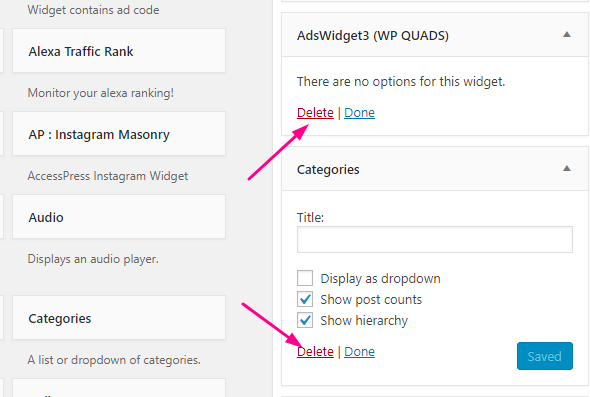
3. Below the widget settings, you can easily find the delete button. Just click on that to delete the widget you have selected.
4. This way you can delete a widget and the settings of that widget too.
If you want to retain the settings of a widget. So that you can use it later then just drag and drop them to Inactive Widget Section.
Some more Prominent ways to setup widgets in WordPress
1. Using text Widget
The Text Widget is one of the most commonly used and important WordPress Widgets that comes with every WordPress installation. It allows a user to add text, video, images, custom lists, and more to their WordPress sites. It is very simple to use. the more coding you know the more you are flexible to optimize it.
WordPress text Widgets can be used to add these pieces of stuff to your WordPress blog –
Note: this is just a sample, you can add more if you are an efficient programmer.
- Ads
- Article promotions
- Cartoons
- Children’s drawings
- Comment Policies
- Copyright Policy
- Disclosure Notice
- Email and contact information
- Events
- Favorite Posts
- Image links
- Images and photographs
- Instructions
- Link Lists
- Links
- Maps and directions
- Messages
- News
- Promotions
- Reviews
- Social Media Links
- Text
- Tips
- Video
To use the WordPress Text Widget:
- Go to Appearance -> Customize in the WordPress Administration Screens and click the Widget menu in the Theme Customizer. Or Go to Appearance -> Widgets in the WordPress Administration Screens.
- Open the sidebar to which you wish to add the Text Widget.
- Find the Text Widget in the list of Widgets.
- Drag and Drop the Widget to the spot you wish it to appear.
To open and edit the Text Widget:
- Click the down arrow to the right of the Text Widget title.
- Set the Text Widget Title (optional).
- Add the text or HTML code to the box or edit what is currently there.
- Choose the option to Automatically add paragraphs to wrap each block of text in an HTML paragraph tag (recommended for text).
- Click Save to save the Text Widget.
- Click Close to close the Text Widget.
- Switch tabs in your browser and preview the results and make changes if necessary.
The Text Widget can hold a variety of HTML, XHTML, and multimedia links and players such as video and object embed.
Supported Codes in text Widget – Basic HTML, embeds, and JavaScript is added easily to the WordPress Text Widget. Most embed codes from social sharing sites for multimedia will work in a WordPress Text Widget. However, active code and programming languages such as PHP will not work as the Widget will strip out the code it cannot display.
2. Using RSS Widget
The RSS Widget allows you to integrate an external feed source for content into a Widget area of your sites, such as your Twitter account, Facebook posts, Google+ posts, or other blogs.
The RSS Widget displays the most recently published content from any source with an active feed. This is an ideal way of integrating outside content into your site.
By default, WordPress RSS Widget displays the post title or the first 100 or so characters of a Tweet or long untitled post. These are either in the form of a link or features a link to the original source depending on the feed’s design and structure.
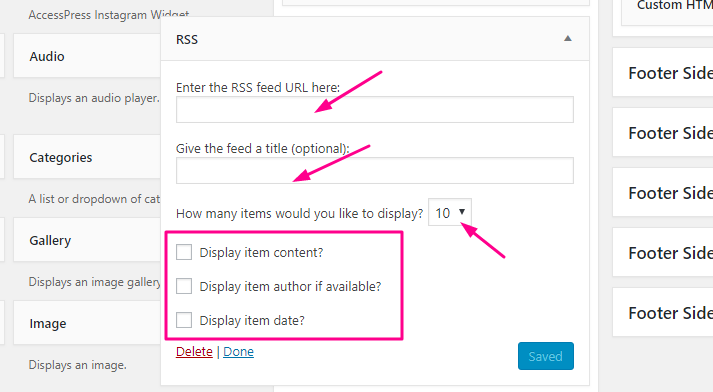
- Enter the RSS feed URL in the first box, copied from the source page for the content you wish to include in your sidebar or other widget location.
- Give the feed a title – This is optional and gives you the chance to showcase the source of the content.
- How many items would you like to display? -By default, the no of items will be 10 but you can choose from 1-20 posts.
- Display item content? – This allows you to show an excerpt of the content, not just the title.
- Display item author if available? – Check it, If you wish to give credit to the original author of the content.
- Display item date? – You can check it if you want to show the date of original content.
You may add multiple RSS Widgets for incoming feeds to your WordPress sidebar and other widget areas of your site.
I hope that now you are familiar with “How to Setup Widgets on WordPress Blog?” If you bave any query you can comment Below.
Recommended
Join Ultimate Blogging Course By Okey Ravi
Subscribe Our YouTube Channel “Okey Ravi” to know more about blogging.









Comments (2)
Read Woq
Hi, very good article. Thanks for sharing, keep up the good work.
Okey Ravi
Thank You
Comments are closed.