How to create a WordPress website with GoDaddy? Complete Set-up
How to create a WordPress website with GoDaddy? Complete Set-up
Today, I am going to talk “How to create a WordPress website with GoDaddy Hosting and Domain?” A lot of people have always asked me, Sir, you don’t have any proper post to start a website step by step. This is the prime reason for writing this article.
So, let’s see the WordPress website creation process with GoDaddy step by step.
Before we start, think about a domain name and create a new email id according to that domain. This we are doing for branding. Because a branding needs the same name at all places. It can either be FB username, Instagram username, twitter username, Youtube link or Gmail id.
Step by step WordPress website creation with GoDaddy
Now I am assuming that you have decided a domain for your business or blog. So, let see who the process goes. The very first thing which you need to do is you have to choose a hosting plan.
Domain will be claimed for free later. So, compare both the plans given below and start with anyone according to your choice. I would recommend you to go with WordPress managed Hosting Plan which we are using on our website.
| Features | Managed WordPress | Web Hosting With Cpanel |
| Domain | Free | Free |
| Price | 1420 INR Max | 1420 INR Max |
| Duration | 1 Year | 1Year |
| SSL | Not included | Not Included |
| SSL Cost | 750 INR | 750 INR |
| Pro dashboard | Free | Paid |
| Backup | Automatic Backup and restore up to 30 days | Manual backup |
| Space | 10 GB SSD | 100 GB |
| Bandwidth | Unmetered | Unmetered |
| Business Email | Free for 1st year | Free for First year |
| Traffic | 25-50K (Anytime Upgrade) | 25-50K (Anytime Upgrade) |
| Website Loading | 2x Faster | Comparatevely Slow |
| Database | 1 GB MySQL | 10 x 1 GB MySQL |
| Buy Link | Buy Now | Buy Now |
Take a close look at the table and decide any one. Once decided click n buy now link provided. After then you will be redirected to GoDaddy website.
Here
Selecting a Hosting Plan
The above comparison s done for basic plans only. But if you want to take Economy or Deluxe plan you can go with that.
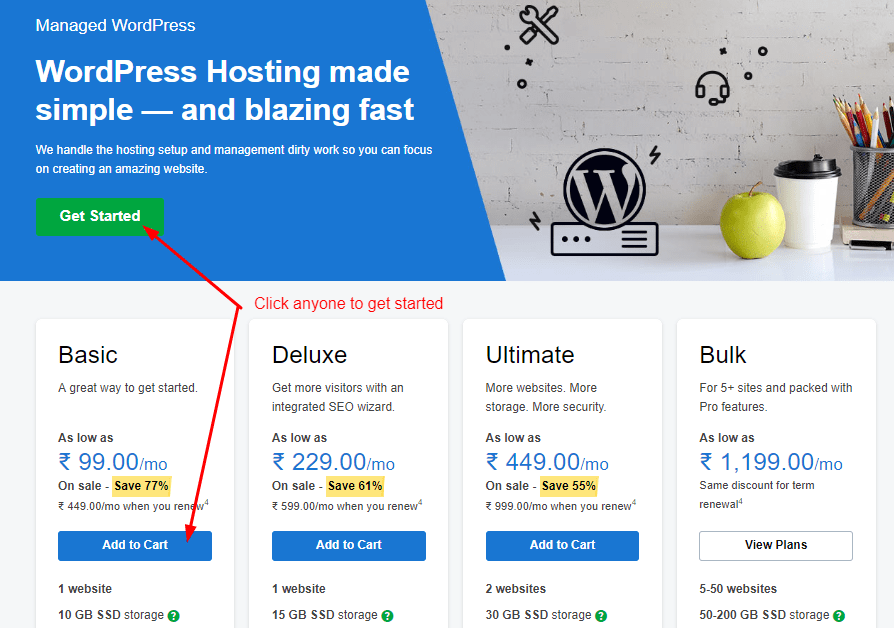
Once the hosting page is loaded either click on Get Started Button or Add to Cart Button. Then you will be redirected to the free domain claim page.
This picture shows the preview of WordPress Managed Hosting.
Claiming a free domain
Once you have selected a hosting plan. Now it’s time to claim a free domain for your business. If you want to perform a research on this, then article will be very helpful in this regard.
Read Now – How to select a perfect domain for your blog, business or brand?
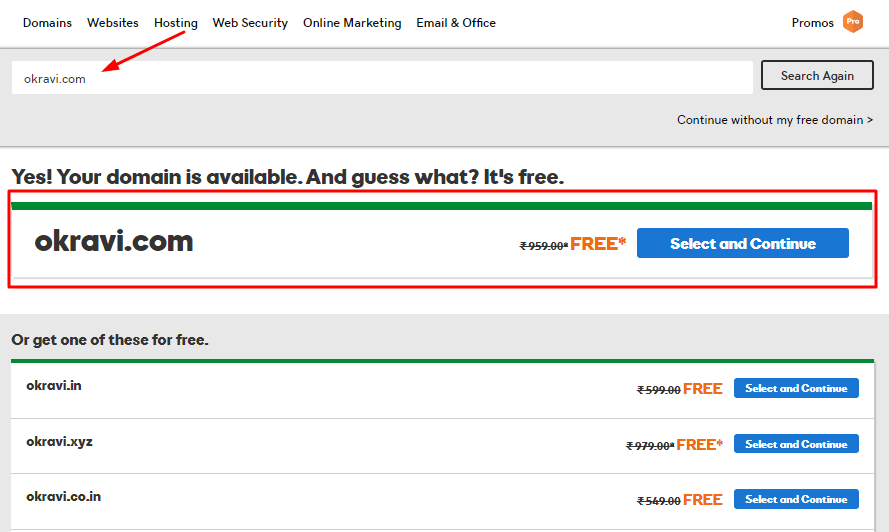
Once your domain name is decided. Enter it into the search bar. If the domain is available. Click on select and continue button to claim it. It will verify the
As you can see i have searched for ‘okravi.com’ and it is available for free claiming.
Creating an account on GoDaddy
Now it’s time to be a GoDaddy user. For that, you have to create an account on GoDaddy. Just click on “create account button” and follow the steps provided.
Follow these simple steps –
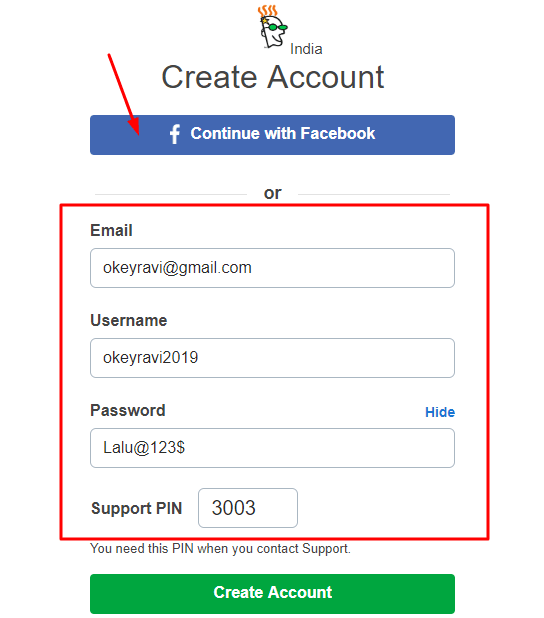
- Enter the email you have created. if you want to use your old email, go for that.
- Choose a username. I will suggest you
to use your email as a username itself.You can use otheruseranme also. - Set a password for your account
- Enter Support PIN – It can be any 4 digit number
- Click on Create Account button to complete the process
Fill up the billing details
Once you done with the account creation, the next step will be billing information filling. Fill the right information there.
You have to fill these details in GoDaddy billing –
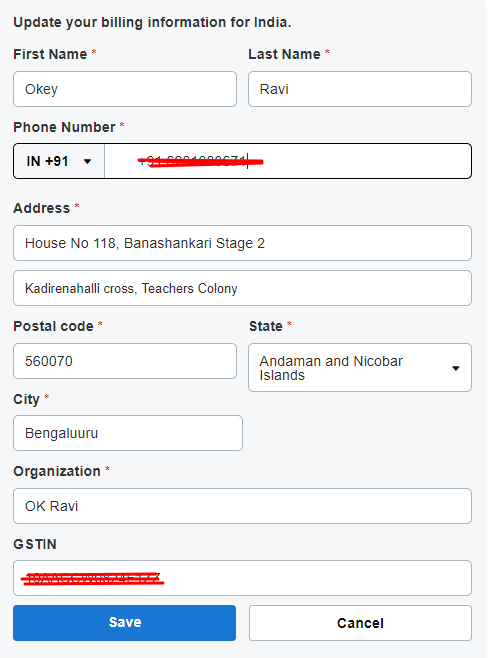
- First Name
- Last Name
- Phone no with country code
- Complete Address
- City
- State
Company you are working in (optional) – Fill “Okey Ravi WEB Services”, if you want to fill.- GST (Optional) -Specific to Inida
Once filled, click on “Save Button” to go to the payment step.
Select a payment medium and complete the payment
After filling and saving the billing details the next step is to choose a suitable payment medium. Indians mostly preferred a debit card, Net banking or wallet system like Paytm or UPI. But, if you have a credit card then you can use that also.
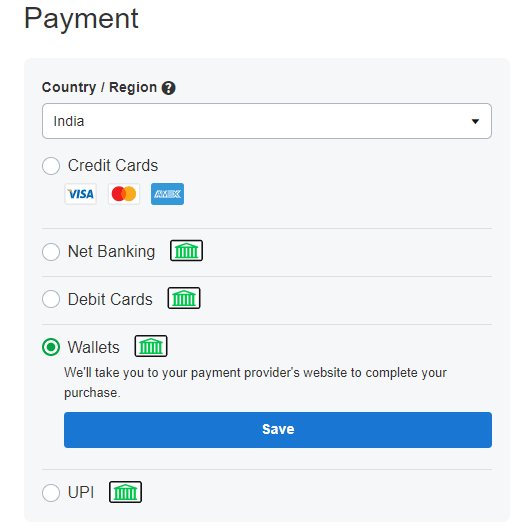
The one think I like about GoDaddy is they provide all payment mediums. Most of the hosting and domain providers like BlueHost, InterServer, Namecheap and HostGator they don’t have all payment mediums available.
Once a payment medium is decided then click on “Complete Purchase” button to fill up the payment details and OTP verification. After the payment completion you will get a receipt on your registered mail.
Verify your registered email
After the purchase of domain and hosting, you will get a mail to verify your GoDaddy account. So, just verify your GoDaddy account. Now the next process is WordPress installation on your purchased domain.
Without WordPress Installation the website creation process will GoDaddy will remain untouched.
Installing WordPress on purchased domain
The next most important step to create a WordPress Website with GoDaddy is WordPress installation. I will describe it in two steps. One for ‘WordPress Hosting without cPanel‘ and other will be for ‘Web Hosting with cPanel‘.
Let’s see them one by one.
WordPress installation on WordPress hosting
If you have purchased a ‘Basic Managed WordPress Hosting’ then WordPress installation is bit easier. Follow the steps –
- Go to ‘My Products’
- Navigate to the hosting you have purchased
- Click on Setup/Manage
- Choose a WordPress username and password
- Choose a datacenter, go with the recommended option
- Wait for the completion of process
Once completed you can access your WP dashboard at http://domainname.com/wp-admin or http://domainname.com/login.
Use your WP username and password to login. If you get a Setup Wizard in between then you can either complete it or skip it for later. Every details will be changed later using WP admin section.
I hope you have logged in to your WordPress now. So, now the question is what do you do next? Here is something for you which you can perform now.
- Have a look at Gutenberg Editor and it’s features
- You can change your theme. If you want to install a premium theme then this is the right time to do it.
- Install WordPress recommended plugins according to your requirements
- Start customizing your website
- Write your first post and learn SEO
- Optimize your website for SEO
WordPress installation on Web hosting
All the steps mentioned above is also applicable in web hosting. But, the only thing it differs from above is, here WordPress installation can be performed using cPanel. I have made a separate post on this. You can follow either of the methods.
Read Recommended – Installing WordPress using Softaculous app installer
What more you need to know?
See, I usually recommend WordPress managed hosting if you want to create a WordPress website with GoDaddy. There is a lot of benefits of using this hosting. The main benefit is the free access of GoDaddy Pro Dashboard. With the help of GoDaddy Pro Dashboard which is the same as ManageWP, you can do a lot of things. I have made a list of them. Have a look –
- You can take daily backup, weekly or scheduled backup
- Restore backup anytime
- The last 2 month backup will be stored. So, two months rollback is possible, which is amazing.
- You can monitor your website SEO and keywords ranking
- Monitor your website uptime
- Easily optimize your post revisions and spam comments
- Safe update WordPress themes and plugins is available
- You can monitor your website traffic using Google Analytics linking
Conclusion
I hope now you have created your website using GoDaddy. Hosting choice is totally up to you. But, my recommendation for you will be GoDaddy managed WordPress plan. You can take Linux hosting also if you want to create a WordPress or any other kind of website.
The one thing I have skipped is SSL installation which you can do later. SSL installation is not required at the time of website creation. This can be done later. But make sure you install an SSL before submitting your site to Google or other webmasters.
If you liked this article, then please subscribe to our YouTube Channel. You can also find us on Twitter and join our Digital marketing hacks Facebook group.
If you have any query or suggestion regarding “How to create a WordPress website with GoDaddy?” then feel free to ask via comments.
Read Next – 7 common SEO mistakes you should avoid


Comments (5)
Deepak singh
Hello Ravi,
We got realy cool tipes related to SEO and website optimization after watching your video. We hope you will guide us in future. It is our request to visite our website and give us your valuable guidance. We are looking forward your replay.
Vany
Very Good article sir, I have also created my website using Godaddy a month back. Want to create 2nd one. I will follow the steps completely.
Okey Ravi
Hi Vany, I am glad that you find it informational.
Akhil bharti
Hi, Ravi, I started my Website with GoDaddy today following this post. Thanks for helping me to get a domain and hosting for Free. Really appreciated.
Okey Ravi
Hi Akhil, Thanks for your appreciation.
Comments are closed.